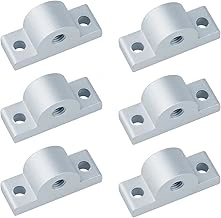
heneng 6-Pcs Caster Wheel Bracket for 2020 Aluminum Extrusion Profile, 5/16" Thick
Engineering-grade criteria for choosing between a custom 80/20 build and a ready-made cockpit.
Use the matching tool first
Start with PC Sim Rig Compatibility & Commissioning Checklist if you want to narrow the fit before checking current offers.
This framework is built for sim racers who demand zero-flex rigidity under high-torque loads - specifically direct drive wheel bases delivering 15 Nm or more and load-cell pedals generating 80+ kg of braking force. If you own or plan to upgrade to equipment in this performance tier, traditional tubular steel rigs and composite cockpits will telegraph vibration, twist under cornering force, and compromise pedal feel. 80/20 aluminum extrusion - typically metric 2020 (20 mm × 20 mm) or 4040 (40 mm × 40 mm) profiles - eliminates flex entirely, creating a stable foundation that isolates every input from your wheel and pedals.
This guide is not for entry-level wheel owners running sub-5 Nm bases, renters without space for permanent installations, or users seeking portable or temporary solutions. The decision between DIY assembly from raw extrusion and ordering a pre-built 80/20 cockpit hinges on budget range ($800 - $2,500+), tool access, time availability, and compatibility priorities with your existing or planned hardware. Both paths deliver the same structural benchmark; the choice lies in upfront cost versus labor, customization depth versus delivery speed, and your willingness to measure, cut, tap, and assemble versus unboxing a turnkey system.
Expect to evaluate rigidity standards, cost breakpoints where DIY savings erode, required tooling for extrusion work, and mounting compatibility for your specific wheel base, pedals, and seat. The framework ahead isolates these variables so you can match your skill set, workspace, and performance goals to the right build path without overspending on features you won't use or underbuilding for the forces your equipment generates.
When DIY 80/20 Makes Sense: Use Case and Skill Prerequisites
DIY 80/20 builds reward builders who can measure twice and tighten once - if you're comfortable reading dimensioned sketches, using a tape measure and hex wrenches, and making small adjustments over a few sessions, aluminum extrusion offers unmatched flexibility. The prerequisite skill set is modest: no welding or advanced fabrication required, but you do need access to a cutting method - either a miter saw with a metal blade, a local makerspace, or a supplier who pre-cuts profiles to your spec. Many builders start with a simple CAD sketch or even graph paper to lock down seat-to-pedal distance, wheel height, and monitor-mount positions before ordering the first length of extrusion.
Material cost typically runs $400 to $900 depending on profile thickness - 20 mm, 40 mm, or 40×80 mm hybrid frames - and whether you source a generic racing seat or invest in a bucket. That range assumes standard T-slot extrusion, a set of corner brackets, and enough fasteners to build a fixed cockpit; motion actuators, triple-monitor beams, or keyboard trays push the budget higher. DIY justifies the effort when your body or setup falls outside the one-size-fits-most envelope: drivers taller than six feet three or shorter than five feet six often find commercial rigs leave the pedal deck too close or the wheel too high, while those planning motion platforms appreciate the ability to reinforce load points and add gussets exactly where actuator forces concentrate.
Custom geometry also pays dividends if you intend to expand - adding a bass-shaker mount, routing cable trays inside the extrusion channels, or repositioning the seat for different sim disciplines without drilling new holes. The iterative nature of T-slot assembly means you can loosen four bolts, slide a bracket ten millimeters forward, and re-tension in under a minute. If your priority is a cockpit that grows with your hardware and adapts to your exact reach and posture, and you have a weekend to invest in careful assembly, DIY 80/20 delivers control that no fixed-geometry pre-built can match.
When Pre-Built Cockpits Are the Smarter Path: Speed, Confidence, and Limits
Pre-built 80/20 sim racing cockpits deliver immediate value when you want a proven geometry, guaranteed compatibility with popular wheelbases and pedal sets, and zero risk of measurement or cutting errors. Most models ship with all fasteners, pre-drilled holes, and assembly instructions that take two to four hours - no cutting tools, no squaring jig, and no second-guessing slot alignment. For builders who prioritize speed and confidence over maximum customization, a well-designed pre-built frame removes the technical friction of a DIY project.
The main constraint is adjustability. Many pre-built cockpits use fixed seat-rail positions or pedal-deck angles optimized for average dimensions, and swapping those geometries later may require drilling new holes or adding aftermarket brackets. Profile thickness is another consideration: entry-level pre-builts often use 2020 or 3030 extrusion where a 4040 upright would deliver better rigidity for wheelbases rated above 20 Nm. If you run high-torque direct-drive hardware, confirm that the upright profiles and wheel-deck bracing match the loads you plan to generate.
Price typically ranges from three hundred fifty to six hundred dollars for legitimate 80/20-style aluminum frames, though premium models with thicker extrusions, integrated monitor mounts, or multi-position adjustability can approach or exceed the material cost of a comparable DIY build. At that upper tier, you lose the cost advantage without gaining the flexibility to modify seat height, pedal angle, or wheelbase position beyond the manufacturer's pre-defined slots. The smart zone for pre-builts is the middle segment: frames that use robust 4040 uprights, offer tool-free slider adjustment for seat and pedal distance, and include compatibility plates for the three or four most common wheelbases.
Choose a pre-built cockpit when your wheelbase and pedal set appear on the manufacturer's verified compatibility list, your body dimensions fall within the advertised adjustment range, and your timeline or skill level makes fabrication risk unacceptable. The tradeoff is clear - you exchange layout flexibility and potential cost savings for assembly speed, known fitment, and a single-source warranty that covers the entire frame.
Cost Breakdown: Real Total Ownership for DIY vs Pre-Built
Understanding the true cost of an 80/20 sim racing cockpit requires accounting for every component, not just the frame price. A DIY build using aluminum extrusion typically runs $200 - 500 for the profile itself, depending on length, slot size (40×40 mm, 40×80 mm, or 80×80 mm), and whether you source from industrial suppliers or sim racing vendors. Add $50 - 100 for brackets, T-nuts, bolts, and corner connectors, then factor in the seat: a standalone racing bucket seat costs $100 - 400, or you may reuse an existing seat to lower expense. Cutting and tooling introduce another variable - pre-cut kits eliminate this cost entirely, while cutting extrusion yourself may require a miter saw with a carbide blade ($50 - 150 if you don't already own one) and deburring tools.
Pre-built cockpits bundle the frame and seat in a single package, generally priced between $330 - 600 for entry-to-mid-tier models. This all-in figure simplifies budgeting and removes the need for measuring, cutting, or sourcing individual fasteners. The tradeoff becomes visible over time: pre-built rigs use fixed mounting holes and welded or riveted joints, so adding a button box, keyboard tray, or shifter mount later may require adapters or drilling. DIY 80/20 frames accept M6 or M8 T-nuts anywhere along the slot, letting you reposition components or add new hardware without permanent modification. If you plan to upgrade from a single monitor to triples, swap wheel bases, or integrate motion actuators, the DIY route spreads cost across multiple purchases but preserves flexibility. Pre-built saves upfront time and reduces assembly error risk, making it the faster path to a working cockpit if your layout is already decided and unlikely to change.
The real breakpoint is expansion intent. A DIY build costs 20 - 40% more at the outset when you include tooling and trial-and-error on bracket fit, but every future addition - monitor mount, handbrake stand, bass shaker bracket - bolts directly into the extrusion grid without adapters. Pre-built frames recover value through faster assembly and bundled seats, yet each accessory addition may require brand-specific parts or custom fabrication. For sim racers who know their final configuration and prioritize immediate use, pre-built delivers better cost efficiency in the first year. For those expecting iterative upgrades or multi-discipline sim use (rally, F1, GT3 with different wheel and pedal positions), DIY 80/20 amortizes its higher initial spend across years of reconfiguration without buying a second cockpit.
Rigidity Testing: What to Expect from 2020 vs 4040 Profiles
Extrusion profile size directly determines how much flex you will feel during high-load inputs. 2020 aluminum extrusion - measuring 20 mm × 20 mm in cross-section - offers sufficient rigidity for wheelbases producing up to 12 - 15 Nm of torque and pedal loads typical of moderate load-cell brake applications. Above that threshold, noticeable flex appears as pedal-deck movement under hard braking and wheel-deck twist when the wheelbase delivers sudden torque spikes.
4040 extrusion, at 40 mm × 40 mm, quadruples the cross-sectional area and raises the second moment of inertia enough to handle direct-drive wheelbases rated at 20 Nm and beyond with negligible deflection. The increased wall thickness and larger internal channels also allow for heavier-duty fasteners and deeper T-nut engagement, which reduce joint play over time.
Joint design matters as much as profile dimension. A 4040 frame assembled with lightweight corner brackets and no diagonal bracing can exhibit more flex than a 2020 build reinforced with gusset plates and cross-braces at critical load points. If you choose 2020 for budget or space reasons, plan to add triangulated supports at the pedal deck and wheelbase mount. Conversely, 4040 requires fewer braces to achieve the same stiffness, simplifying assembly and leaving more room for seat adjustments and accessory mounts.
Evaluate your wheelbase torque rating and brake load-cell capacity first, then select the smallest profile size that keeps flex below perceptible thresholds - this approach balances cost, weight, and build complexity without over-engineering the structure.
Adjustability and Future-Proofing: Where DIY Pulls Ahead
DIY 80/20 aluminum cockpits offer significant advantages when you plan to expand or reconfigure your setup over time. Because every joint uses standard T-slot fasteners and corner brackets, you can add side-mounted button boxes, triple-monitor stands, keyboard trays, shifter mounts, handbrake platforms, or even motion actuator mounting points without drilling, welding, or buying proprietary adapters. Each accessory attaches to the existing extrusion grid using drop-in nuts and bolts, making expansion straightforward and reversible.
Pre-built cockpits with welded steel frames or proprietary mounting brackets constrain these additions. Fixed geometry means you must work around the manufacturer's pre-drilled holes and attachment points, and aftermarket accessories may require custom fabrication or adapters that introduce flex. If the manufacturer discontinues a product line, replacement parts and compatible mounts may become unavailable, limiting your ability to adapt the cockpit as your hardware evolves.
Some pre-built options use standard 40×40 mm or 40×80 mm T-slot extrusion and market themselves as modular, offering a middle ground between fully custom DIY builds and fixed welded frames. These designs let you attach common off-the-shelf 80/20 accessories, but the initial geometry - seat position, pedal deck angle, wheelbase mounting height - is still dictated by the manufacturer's design. You gain accessory compatibility but sacrifice the freedom to define base dimensions and angles from scratch.
Future-proofing matters most if you anticipate upgrading to direct-drive wheelbases with different bolt patterns, adding load-cell pedals that require stiffer mounting, or integrating tactile transducers and motion systems that demand precise placement of mounting points. DIY 80/20 builds let you iterate on positioning and reinforcement as your hardware changes, while pre-builts lock you into a fixed starting point that may require workarounds or replacement as your needs grow.
Final Decision Matrix: Mapping Your Constraints to the Right Path
The cockpit decision ultimately maps to four constraints: timeline, tooling access, dimensional fit, and long-term expansion intent. If you have access to a miter saw or chop saw, need custom reach or height geometry outside typical ergonomic ranges, or plan to iterate pedal tray angles and monitor mount positions over multiple seasons, the DIY 80/20 path justifies its higher upfront time investment. The ability to relocate mounting points without drilling new holes and adapt to wheelbase upgrades or motion platforms gives DIY builds a structural advantage for evolving rigs.
Pre-built cockpits deliver value when speed to first session, lower assembly error risk, and confidence in documented compatibility matter more than geometric customization. If your body dimensions fall within the adjustable range of established frames and you prioritize turning budget toward higher-tier wheelbases or load cell pedals rather than tooling and iterative assembly, a validated pre-built frame offers faster return on investment and predictable lead times.
Both paths require identical downstream investments - direct-drive wheelbase, pedal set, seat or integrated shell, and mounting hardware - so the cockpit itself should not dominate total budget planning. A DIY frame running $400 in extrusion and hardware still needs $800 - 2,000 in peripherals to function; a $600 pre-built follows the same peripheral cost curve. The cockpit choice should align with how you intend to use, modify, and expand the rig over the next two to three years, not just the immediate cash outlay. If your long-term vision includes regular geometry changes, accessory additions, or resale with modular teardown, DIY retains more flexibility. If your priority is validated stability for a fixed wheelbase and pedal combination with minimal ongoing adjustment, pre-built reduces variables and accelerates the path to consistent lap times.
Core Criteria: What Matters Most in the DIY vs Pre-Built Decision
- Rigidity under load: 2020 vs 4040 profile sizing and frame geometry impact on flex with high-torque direct-drive wheels
- Cost breakpoint: typical DIY builds run $400 - $900 in materials alone; pre-builts start $350 - $600 but may limit customization
- Tooling and skill floor: DIY requires measuring, cutting (or ordering pre-cut), tapping, and T-nut alignment; pre-builts need hex keys only
- Adjustability range: DIY offers infinite positioning; pre-builts constrain pedal deck angle, wheel height, and seat travel to fixed slots
- Time investment: 8 - 20 hours for first-time DIY builds vs 1 - 3 hours assembly for pre-builts
- Future-proofing: 80/20 allows bolt-on additions (button boxes, monitor mounts, motion actuators); pre-builts accept accessories via T-slot or adapters
- Shipping and material sourcing: DIY extrusions add $50 - $150 freight; pre-builts include integrated shipping in retail price
Common Mistakes to Avoid in Both DIY and Pre-Built Builds
- DIY: ordering incorrect profile slot size (metric vs imperial) or mismatching T-nut threading (M5 vs M6)
- DIY: cutting extrusion without accounting for bracket and joint thickness, leading to dimensional creep
- DIY: underestimating total weight and floor load - full rigs with seat, wheel, and pedals exceed 100 lbs
- Pre-built: assuming all 80/20-style frames use genuine 80/20 brand extrusion or equivalent wall thickness
- Pre-built: ignoring wheelbase torque limits - some $350 frames flex under 15+ Nm loads despite aluminum construction
- Both: failing to plan cable routing and power strip mounting before final assembly
heneng 6-Pcs Caster Wheel Bracket for 2020 Aluminum Extrusion Profile, 5/16" Thick
If you want to roll your multiple/20 cockpit away from the wall for cleaning or reposition it between sessions, adding mobility hardware is simpler than rebuilding the frame. The heneng 6-Pcs Caster Wheel Bracket set is designed specifically for 2020 aluminum extrusion profile, delivering six brackets machined from 5/16-inch-thick steel plate. Each bracket is drilled to accept standard caster stems and bolts directly into the T-slot channel without drilling the aluminum. This pack supplies enough brackets for four wheels plus two spares, or you can distribute all six under a heavier cockpit to spread the load.
The 2020 profile compatibility is tight - these brackets slide into the listed size slot and lock with drop-in T-nuts or hammer-head fasteners. The 5/16-inch plate thickness provides rigidity under a loaded cockpit, though total stability depends on the casters you pair with the brackets. Locking swivel casters are recommended for carpet installations to prevent drift during high-force braking inputs, while non-locking fixed or swivel casters work on hard floors if you store the rig against a wall. Load rating becomes critical if your cockpit exceeds the listed size with seat, pedal deck, and wheel base installed - check the individual caster's rated capacity and divide your total rig weight by the number of wheels to ensure each bracket stays within spec.
The six-piece count allows flexibility: mount four for a stable rectangle, or use six in a triangular or hexagonal footprint for larger or non-rectangular frames. Bolt length and thread pitch must match both the bracket holes and your chosen caster stem; M8 or 5/16-inch hardware is typical, but verify dimensions before ordering casters separately. Because the brackets do not include wheels, plan to source locking casters with a minimum 2-inch wheel diameter to clear pedal trays and avoid snagging cables underneath the frame.
At $16.99 for six brackets, this set costs less than welding fixed feet or fabricating custom mounts. It is a practical upgrade for DIY builders who already own a 2020-profile cockpit and want the option to move the rig without disassembly, provided you select casters that match your floor type, total weight, and locking requirements.
- ✅ Six 5/16-inch steel brackets fit 2020 aluminum profile T-slots without drilling
- ✅ Allows four-wheel or six-wheel caster configurations depending on rig size and weight
- ✅ Drop-in installation with standard T-nuts or hammer-head fasteners
- ✅ $16.99 for the full bracket set
- ⚠️ Casters sold separately - load rating, locking mechanism, and wheel size must be matched to your rig
- ⚠️ Bolt length and thread pitch vary by caster model; verify hardware compatibility before assembly
- ⚠️ Non-locking casters can allow drift on carpet under heavy pedal force

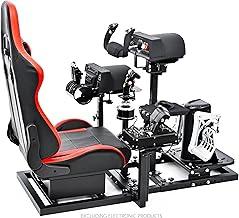
Anman GT/F1 Sim Racing Cockpit and Stand
The Anman GT/F1 Sim Racing Cockpit and Stand sits at the $399.99 price point, positioning itself as a pre-built option for racers who want structural rigidity without sourcing individual aluminum extrusions. Built around a tubular steel frame rather than modular multiple/multiple profile, this cockpit offers fixed mounting geometry that prioritizes quick assembly over the infinite adjustability of DIY aluminum builds.
The stand includes dedicated mounting plates for both GT (horizontal) and F1 (angled) wheel positions, allowing you to switch between racing styles without fabricating custom brackets. Pedal deck adjustment is handled through pre-drilled holes at set intervals, giving you discrete positions rather than the slide-anywhere freedom of T-slot extrusion. This approach works well if your seating position falls within the designed range, but offers no recourse if you need micro-adjustments or non-standard angles.
Assembly requires only basic hand tools and typically completes in under two hours - significantly faster than a DIY multiple/multiple build that involves measuring, cutting, squaring, and iterative fitting. The tradeoff is upgrade flexibility: adding monitor mounts, button boxes, or shifting the wheel deck forward may require drilling new holes or sourcing third-party brackets, whereas multiple/multiple builders simply slide a T-nut into any point along the extrusion.
The tubular frame construction delivers good rigidity for entry and mid-tier wheelbases, though maximum recommended torque is not specified by the manufacturer. Users with high-torque direct-drive bases above multiple Nm should verify frame flex tolerance before committing, as steel tube cockpits can exhibit more lateral movement under peak force than thick-walled multiple/multiple profiles. For moderate-torque setups and belt-driven wheelbases, the frame provides a stable platform at half the cost of equivalent pre-built multiple/multiple rigs.
This cockpit makes sense if you value fast setup and predictable geometry over long-term modularity. Racers planning frequent hardware changes, unusual mounting angles, or future integration of motion actuators will find the fixed-hole design limiting compared to the open-ended adaptability of DIY extrusion frames.
- ✅ Pre-built frame assembles in under two hours with basic tools
- ✅ Includes dual mounting plates for GT and F1 wheel positions
- ✅ Priced at $399.99, roughly half the cost of entry-level 80/20 pre-builts
- ✅ Tubular steel construction provides good rigidity for mid-tier wheelbases
- ⚠️ Fixed mounting holes limit micro-adjustment and custom angles
- ⚠️ No specified maximum wheelbase torque rating
- ⚠️ Upgrading with third-party accessories may require drilling or adapters
- ⚠️ Less long-term modularity than T-slot aluminum extrusion frames
Marada Modular Flight Racing Simulator Cockpit
The Marada Modular Flight Racing Simulator Cockpit offers a dual-purpose frame designed to accommodate both racing wheels and flight stick setups, currently priced at $379.99. This modular approach addresses the needs of users who switch between racing and flight simulation, though that versatility introduces ergonomic tradeoffs compared to single-discipline frames.
The cockpit features adjustable mounting points that accept both racing wheel bases and flight stick hardware. The modular design allows repositioning of control mounts without permanent modification, making it easier to reconfigure between sim types. However, the geometry optimized for dual use may not match the aggressive seat angle and low wheel position that dedicated racing frames provide, particularly for formula-style seating preferences.
Frame rigidity under racing wheel force feedback is a critical consideration. While the Marada uses a welded steel construction, the wider stance needed to accommodate flight stick side-mounting can introduce flex under high-torque direct-drive wheels compared to narrower racing-specific profiles. For mid-range belt-driven or gear-driven wheels, the frame provides adequate stability. Flight stick side-loads typically generate less torsional stress than racing wheel feedback, so rigidity concerns weigh more heavily on the racing side of dual use.
Seat adjustability includes fore-aft positioning and angle adjustment, but the available range favors an upright posture more suitable for flight simulation than the reclined position many racing sim users prefer. The compromise works best for users who prioritize flexibility over position optimization in either discipline.
At $379.99, the Marada sits below most aluminum extrusion racing cockpits but above basic wheel stands. Single-purpose pre-built racing frames in the multiple range typically offer more aggressive racing geometry and stiffer mounting for wheels, while flight-specific frames provide better overhead and side-panel mounting for switches and throttle quadrants. The value proposition depends on whether you need genuine dual-use capability or would benefit more from discipline-specific optimization.
The 4.5/5 user rating suggests general satisfaction, though prospective buyers should verify their primary use case. If racing is the dominant activity with occasional flight sim sessions, a dedicated racing frame with accessory flight mounts may deliver better wheel rigidity. If flight simulation is primary or usage splits evenly, the modular design reduces the need for separate frames or extensive reconfiguration.
- ✅ Modular mounting points for both racing wheels and flight sticks
- ✅ Adjustable seating position for dual-use flexibility
- ✅ No permanent modification required to switch between sim types
- ✅ Priced below most aluminum extrusion cockpits at $379.99
- ⚠️ Seat geometry favors upright posture over aggressive racing position
- ⚠️ Wider stance may introduce flex under high-torque direct-drive wheels
- ⚠️ Dual-use compromise sacrifices optimization for single-discipline setups
- ⚠️ Mounting range may not suit formula-style seating preferences
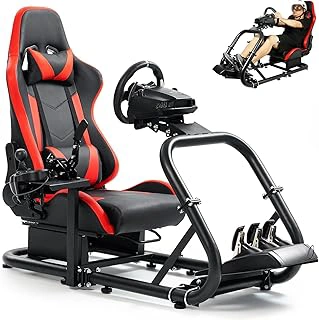
Marada Racing Sim Cockpit Stand with Comfortable Seat
The Marada Racing Sim Cockpit Stand with Comfortable Seat is the lowest-cost complete pre-built option in this comparison, priced at $329.99. Unlike pure multiple/multiple frames or modular rigs that ship without seating, this cockpit arrives with an integrated seat, pedal deck, and wheel mount - offering immediate usability out of the box.
The included seat features padded upholstery and modest side bolstering. It provides basic comfort for casual-to-moderate session lengths but lacks the deep lateral support and adjustable lumbar geometry found in dedicated bucket seats. The recline mechanism allows some position adjustment, though the seat itself is fixed to the frame and cannot be swapped without modifying or replacing the entire rear assembly.
Frame rigidity is adequate for entry-level wheelbases and load-cell pedals up to moderate force levels. The steel tube construction resists lateral flex during corner inputs, but the overall stiffness falls short of welded multiple/multiple aluminum profiles. Under heavy braking with high-end load-cell pedals, you may notice slight pedal deck movement compared to stiffer rigs.
The upgrade path is constrained by the integrated seat design. If you later want to install a racing bucket seat, the existing seat assembly must be removed, and the frame may require drilling or bracket fabrication to mount aftermarket sliders. The pedal deck angle is set and not easily adjustable without cutting or adding spacers. Compatibility with direct-drive wheelbases is possible but depends on the base's mounting footprint and whether the included wheel deck can handle the torque without flexing.
The seat is an advantage if you need a turnkey solution with no additional purchases - just attach your wheel, pedals, and start driving. It becomes a constraint if you prioritize long-term flexibility, plan to upgrade to stiffer components, or prefer the modularity of separate seat and frame choices. For new sim racers on a tight budget who value immediate setup over future customization, the Marada offers a functional entry point. For users who anticipate upgrading peripherals or prefer the rigidity and flexibility of multiple/multiple builds, the integrated seat may limit rather than enable growth.
- ✅ Lowest-cost complete cockpit at $329.99 with seat, frame, and mounts included
- ✅ Immediate usability - no separate seat purchase required
- ✅ Padded seat with basic bolstering and recline adjustment
- ✅ Adequate frame rigidity for entry-level wheelbases and moderate load-cell pedals
- ⚠️ Integrated seat limits upgrade path to bucket seats without frame modification
- ⚠️ Steel tube frame less rigid than 80/20 aluminum under heavy braking loads
- ⚠️ Fixed pedal deck angle not easily adjustable
- ⚠️ Seat padding and bolstering less supportive than dedicated racing buckets for long sessions